235 lines
8.0 KiB
Markdown
235 lines
8.0 KiB
Markdown
+++
|
|
date = "2022-09-03"
|
|
tags = ["python","ai","illust","diffusion"]
|
|
title = "diffusion img2imgでイラストを再生成してみた"
|
|
slug = "diffusion-img2img"
|
|
+++
|
|
|
|
[diffusion](https://github.com/huggingface/diffusers)というツールがあり、[huggingface.co](https://huggingface.co/)からtokenをもらってAIによる画像ファイルを生成できます。
|
|
|
|
なお、cudaをサポートしている環境下で実行してください。
|
|
|
|
```sh
|
|
$ pip install transformers scipy ftfy
|
|
$ pip install git+https://github.com/huggingface/diffusers.git
|
|
```
|
|
|
|
```python:t.py
|
|
import torch
|
|
from diffusers import StableDiffusionPipeline
|
|
from torch import autocast
|
|
|
|
MODEL_ID = "CompVis/stable-diffusion-v1-4"
|
|
DEVICE = "cuda"
|
|
YOUR_TOKEN = "xxx"
|
|
|
|
pipe = StableDiffusionPipeline.from_pretrained(MODEL_ID, revision="fp16", torch_dtype=torch.float16, use_auth_token=YOUR_TOKEN)
|
|
pipe.to(DEVICE)
|
|
|
|
prompt = "a dog painted by Katsuhika Hokusai"
|
|
|
|
with autocast(DEVICE):
|
|
image = pipe(prompt, guidance_scale=7.5)["sample"][0]
|
|
image.save("test.png")
|
|
```
|
|
|
|
```sh
|
|
$ python3 t.py
|
|
```
|
|
|
|
次に、img2imgを使って画像ファイルを参照した上で生成してみます。input.pngを置いておきます。
|
|
|
|
```python:tt.py
|
|
import torch
|
|
from diffusers import StableDiffusionPipeline
|
|
from torch import autocast
|
|
|
|
MODEL_ID = "CompVis/stable-diffusion-v1-4"
|
|
DEVICE = "cuda"
|
|
YOUR_TOKEN = "xxx"
|
|
|
|
pipe = StableDiffusionPipeline.from_pretrained(MODEL_ID, revision="fp16", torch_dtype=torch.float16, use_auth_token=YOUR_TOKEN)
|
|
pipe.to(DEVICE)
|
|
|
|
from PIL import Image
|
|
from torch import autocast
|
|
|
|
prompt = "cute girl"
|
|
init_image = Image.open("input.png").convert("RGB")
|
|
init_image = init_image.resize((512, 512))
|
|
with autocast("cuda"):
|
|
images = pipe(
|
|
prompt=prompt,
|
|
init_image=init_image,
|
|
strength=0.75,
|
|
guidance_scale=7.5,
|
|
num_inference_steps=50,
|
|
generator=None,
|
|
)["sample"]
|
|
images[0].save("output.png")
|
|
```
|
|
|
|
localでのpython動作環境が難しいなら[google colab](https://colab.research.google.com)を使う方法もあります。
|
|
|
|
その他、モデルをcloneしてくる方法もあるようです。
|
|
|
|
```sh
|
|
$ git clone https://github.com/basujindal/stable-diffusion
|
|
# git clone https://github.com/CompVis/stable-diffusion
|
|
$ cd stable-diffusion
|
|
$ conda env create -f environment.yaml
|
|
$ conda activate ldm
|
|
|
|
# huggingface.coで同意すればcloneできるようになる
|
|
$ git clone https://huggingface.co/CompVis/stable-diffusion-v-1-4-original
|
|
$ mv stable-diffusion-v-1-4-original stable-diffusion/models/ldm/stable-diffusion-v1
|
|
$ mv sd-v1-4.ckpt model.ckpt
|
|
|
|
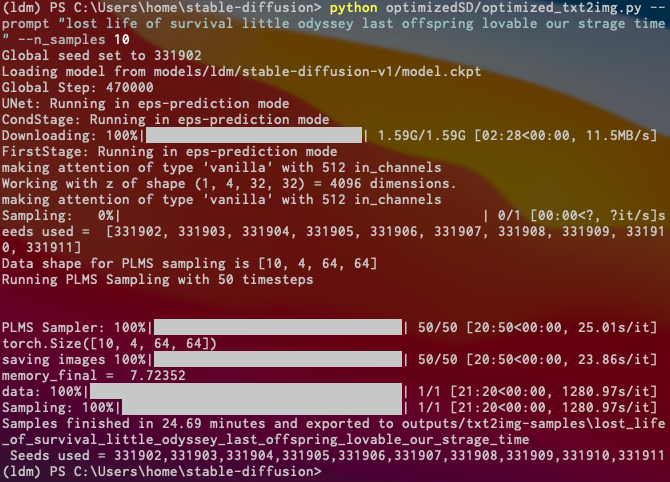
$ python optimizedSD/optimized_txt2img.py --prompt "Cyberpunk style Tokyo landscape" --H 512 --W 512 --seed 27 --n_iter 2 --n_samples 10 --ddim_steps 50
|
|
$ ls outputs/txt2img-samples/
|
|
```
|
|
|
|
ref : https://zenn.dev/koyoarai_/articles/02f3ed864c6127bb2049
|
|
|
|
windowsでやるには以下のような感じになります。
|
|
|
|
```sh
|
|
# cuda 11.6
|
|
$ scoop bucket add extras
|
|
$ scoop install anaconda3 python
|
|
$ conda init powershell
|
|
$ git clone https://github.com/basujindal/stable-diffusion
|
|
$ mkdir -p ~/stable-diffusion/models/ldm/stable-diffusion-v1
|
|
$ mv sd-v1-4.ckpt ~/stable-diffusion/models/ldm/stable-diffusion-v1/model.ckpt
|
|
$ cd stable-diffusion
|
|
$ conda env create -f environment.yaml
|
|
$ conda activate ldm
|
|
# pytorchはcuda 11.6に対応しています
|
|
$ conda install pytorch torchvision torchaudio cudatoolkit=11.6 -c pytorch -c conda-forge
|
|
$ conda install jupyter pandas matplotlib -c conda-forge
|
|
$ pip install diffusers transformers scipy ftfy
|
|
```
|
|
|
|
次回からは`$ conda activate ldm`で使います。
|
|
|
|
```sh
|
|
$ conda activate ldm
|
|
$ cd ~/stable-diffusion
|
|
$ python optimizedSD/optimized_txt2img.py --prompt "Cyberpunk style Tokyo landscape" --H 512 --W 512 --seed 27 --n_iter 2 --n_samples 10 --ddim_steps 50
|
|
|
|
# ~/input.png
|
|
# convert -resize 700x510 o.png input.png
|
|
$ python optimizedSD/optimized_img2img.py --prompt "kawaii girl rim light" --init-img C:\Users\syui\input.png --strength 0.2 --n_iter 2 --n_samples 2 --H 300 --W 230
|
|
|
|
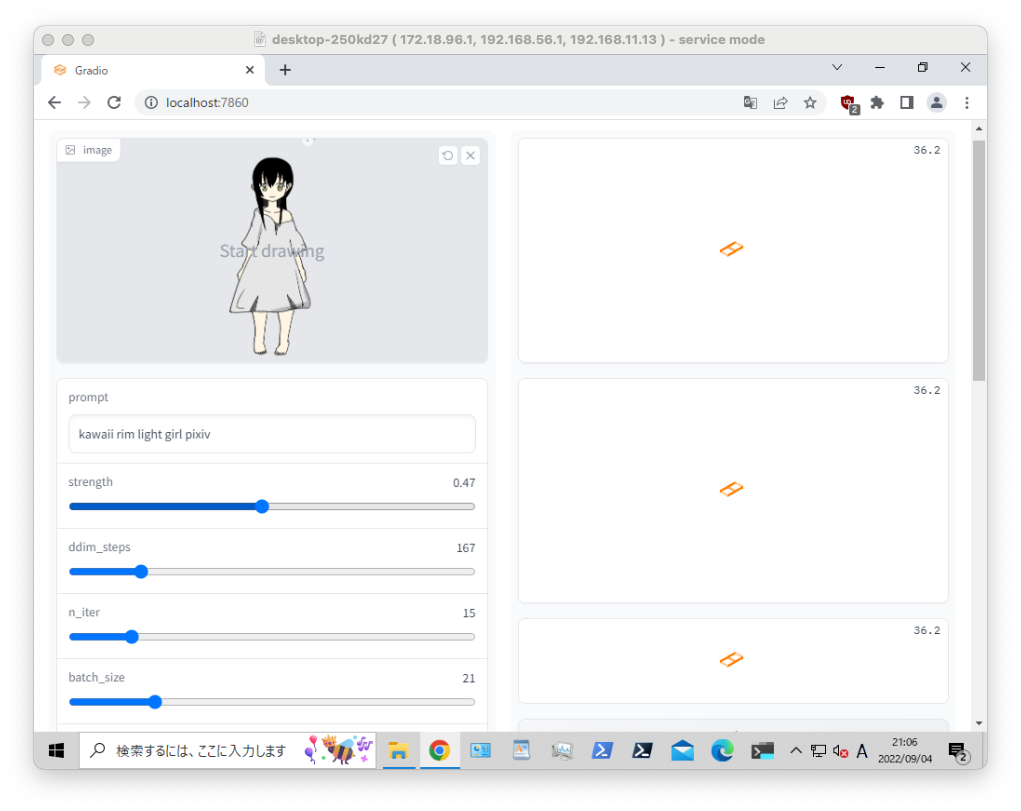
$ python optimizedSD/inpaint_gradio.py --init-img C:\Users\syui\input.png
|
|
# open localhost:7860
|
|
|
|
$ ls outputs/*
|
|
$ tree outputs/
|
|
```
|
|
|
|
|
|
|
|

|
|
|
|
|
|
|
|
pythonの`import torch, torch.cuda.is_available()`がfalseの場合、pytorchがcudaと連携されていません。
|
|
|
|
```py:test.py
|
|
import torch
|
|
torch.cuda.is_available()
|
|
```
|
|
|
|
以下のエラーが出る場合はvramの容量が確保できていないので、`basujindal/stable-diffusion`の軽量版を使います。
|
|
|
|
> RuntimeError: CUDA out of memory. Tried to allocate 20.00 MiB (GPU 0; 4.00 GiB total capacity; 3.42 GiB already allocated; 0 bytes free; 3.48 GiB reserved in total by PyTorch) If reserved memory is >> allocated memory try setting max_split_size_mb to avoid fragmentation. See documentation for Memory Management and PYTORCH_CUDA_ALLOC_CONF
|
|
|
|
### windows + cuda + wsl + anaconda
|
|
|
|
次はwslで構築する方法です。memoryは多めに必要です。anaconda上でmodelをdlして使う方法です。
|
|
|
|
```sh
|
|
$ wsl --install -d ubuntu-20.04
|
|
$ shutdown /r /f /t 0
|
|
# ubuntu setting user
|
|
$ wsl --distribution ubuntu-20.04 --user xxx
|
|
# wsl --user xxx
|
|
|
|
$ cd
|
|
$ wget https://repo.anaconda.com/archive/Anaconda3-2022.05-Linux-x86_64.sh
|
|
$ sh Anaconda3-2022.05-Linux-x86_64.sh
|
|
$ export PATH=~/anaconda3/bin:$PATH
|
|
$ conda create -n stable-diffusion python=3.9
|
|
$ conda activate stable-diffusion
|
|
# pytorchはcuda 11.6に対応しています
|
|
$ conda install pytorch torchvision torchaudio cudatoolkit=11.6 -c pytorch -c conda-forge
|
|
$ conda install jupyter pandas matplotlib -c conda-forge
|
|
$ pip install diffusers transformers scipy ftfy
|
|
$ python ./t.py
|
|
```
|
|
|
|
ref : https://tadaoyamaoka.hatenablog.com/entry/2022/08/23/222813
|
|
|
|
環境構築後は、以下のコマンドで実行します。私の実行環境は`mac -> ssh -> windows -> pwsh -> wsl -> anaconda`となっています。
|
|
|
|
```sh
|
|
$ wsl --user xxx
|
|
$ conda activate stable-diffusion
|
|
$ python ./t.py
|
|
```
|
|
|
|
次に`stable-diffusion-webui`を試してみます。画像処理に関してはcliよりwebuiのほうがおすすめです。ただし、自動化する場合はcliで動作する環境が必要です。
|
|
|
|
https://github.com/hlky/stable-diffusion-webui
|
|
|
|
```sh
|
|
# 以下はすべてanaconda上に構築します。したがって、最初にactiveを実行しておきます
|
|
$ conda activate stable-diffusion
|
|
$ pip install diffusers transformers scipy ftfy invisible-watermark gradio pynvml omegaconf pytorch_lightning
|
|
$ pip install git+https://github.com/crowsonkb/k-diffusion/
|
|
|
|
# taming-transformers
|
|
$ git clone https://github.com/CompVis/taming-transformers.git
|
|
$ cd taming-transformers
|
|
$ pip install -e .
|
|
|
|
# diffusion
|
|
$ cd
|
|
# git clone https://github.com/basujindal/stable-diffusion.git
|
|
$ git clone https://github.com/CompVis/stable-diffusion.git
|
|
|
|
# diffusion-webui
|
|
$ cd
|
|
$ git clone https://github.com/hlky/stable-diffusion-webui.git
|
|
$ cd stable-diffusion-webui
|
|
$ cp -r * ../stable-diffusion/
|
|
|
|
# download model
|
|
$ sudo apt update
|
|
$ sudo apt install git-lfs
|
|
# sizeが大きいのでcloneするにはlfsの設定が必要
|
|
$ git lfs install
|
|
$ cd
|
|
# modelをcloneするにはライセンスに同意します
|
|
# https://huggingface.co/CompVis/stable-diffusion-v-1-4-original
|
|
$ git clone https://huggingface.co/CompVis/stable-diffusion-v-1-4-original
|
|
$ mkdir -p ~/stable-diffusion/models/ldm/stable-diffusion-v1
|
|
$ cd ~/stable-diffusion/models/ldm/stable-diffusion-v1
|
|
$ ln -s ~/stable-diffusion-v-1-4-original/sd-v1-4.ckpt model.ckpt
|
|
# ファイル構成は以下のとおりです
|
|
# stable-diffusion/models/ldm/stable-diffusion-v1(stable-diffusion-v-1-4-original)/model.ckpt
|
|
|
|
# install diffusion
|
|
$ cd ~/stable-diffusion
|
|
$ pip install -e .
|
|
$ python webui.py
|
|
|
|
$ curl -sL http://localhost:7860/
|
|
$ ipconfig /all
|
|
192.168.1.10
|
|
# http://192.168.1.10:7860
|
|
```
|
|
|
|
ref : https://tadaoyamaoka.hatenablog.com/entry/2022/08/28/232041
|